.png?height=120&name=rockcontent-branco%20(1).png)
If your content was scheduled but was not published and you received the message of "Scheduling Lost", you can correct it by adjusting the time and installing a plugin!
This tutorial is for posts that have been scheduled on WordPress. For posts that were scheduled only through Studio, check out this link.
If your publication that was scheduled on WordPress did not get published to the blog, check out this tutorial on how to correct it. But first, see if in the publication, the missed scheduling alert appeared:

If this alert appeared, your publication may have failed because the time zone needs to be corrected and a plugin must be installed. Follow in this tutorial to know how to make these changes.
How do I change my WordPress time zone?
To change the time zone, just go to in the side menu and look for Settings > General. In the Time Zone section, scroll up to see the option that fits your location and select:
-21.png?width=512&name=unnamed%20(2)-21.png)
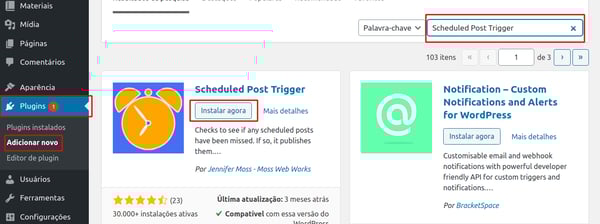
How to install the Scheduled Post Trigger plugin?
The Scheduled Post Trigger plugin serves as an "alert" so that your scheduled blog posts don't fail. That is, they are an additional guarantee when making your scheduled posts go to your blog.
To install it, go to your blog's WordPress panel. Then, go to the left navigation menu and select Plugins > Add new. Search for Scheduled Post Trigger in the search bar and click "Install now".
Then, go to Plugins and then click Activate:

All done! By doing this, your scheduled blog posts on WordPress will be published without fail!
Got a question or need help? You can reach us at Studio chat or email at help@rockcontent.com and we will help you, ok?