.png?height=120&name=rockcontent-branco%20(1).png)
The Creative Management screen is where you add your pages and has a lot of functionality!
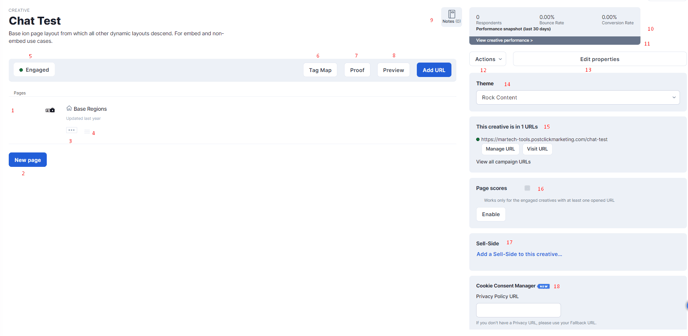
Using the screenshot above, here’s a guide to what’s what:
- To add content to your page, just click the page thumbnail.
- To add pages to your creative, just click the green “New page” button
- Click the icon with three dots to open a dropdown menu to make that page the landing page, duplicate that page or delete the page
- Click and drag the handle icon to rearrange your pages visually within the creative management screen. Please note that this does not impact the functionality of your creative.
- The status dropdown menu can be used to toggle your creative between Draft, Engaged and Archived mode. Your creative must be engaged in order to assign a URL to it.
- The Proof button can be used to open a window to review all the content for all of your pages in one place. This is a great tool to check for typos throughout the creative, review tags, etc.
- Use the "Preview" button to preview a creative exactly the way a respondent will. Preview allows you to fully experience the creative, without affecting the creative's results.
- After engaging your creative, you will be able to click the Add URL button to create a URL for your ion experience.
- Click the notes button to leave a note for yourself and anyone else who might access your creative in the future. This allows you to make notes when changes are made, so you have a revision history.
- Quick snapshot for the number of respondents, bounce rate and conversion rate for your creative over the last 30 days.
- View creative performance metrics that go beyond the 30-day snapshot.
- Use the Actions' dropdown to duplicate or delete your creative.
- The “Edit properties” button will pull up the Edit Creative screen where you can edit the creative’s title, add/remove tracking scripts and enable SEO directives.
- Themes control the styling applied to the content within a given creative. You can change the theme of your creative by selecting a new one from the theme dropdown on the right side of the Creative Management screen.
- View all URLs associated with your creative.
- Page Scores, works similar to Google Analytics data.
- Add a sell-side experience to your creative. For more information on sell-side, click here.
- Enable a cookie consent page to allow visitors to opt into or out of third party cookies. For more information on this feature, click here.
If you have any questions, please contact us on help@rockcontent.com. 😀