.png?height=120&name=rockcontent-branco%20(1).png)
The 1st step is to download the file that was sent by our team. Inside it, you'll find folders containing the WordPress files and the database (.sql).
The files will be organized like this:

Your blog's content will be available in the wp-content folder, as shown in the image below:

The wp-content folder contains all the content of your blog - such as pages, plugins, etc.
As for the dump.sql file, it's your blog's database!
To use them, you'll need a WordPress installation on a hosting service. You'll need to migrate and replace the files of your new WordPress installation with the ones provided.
Next, the 2nd step is:
- Delete the wp-config.php file;
- Rename the wp-config-sample.php file to wp-config;
- Click on wp-content and delete the mu-plugins folder (if it exists);
Once that's done, the 3rd step is to log into your website's admin panel and access CPANEL.
In the 4th step, you should click on File Manager and then create a folder named Blog. Inside this folder, place the WordPress files you had downloaded.
For the 5th step, return to the CPANEL home page and click on MySQL Database Wizard to create the database.
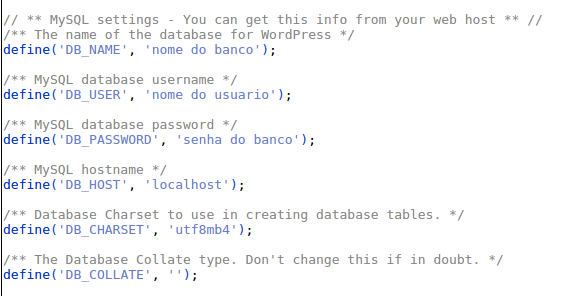
In the 6th step, navigate to the Blog folder created in the 4th step and edit the wp-config.php file, entering:
- Database name;
- Username;
- Database password;
In the 7th and final step, access phpMyAdmin and import the database.
After uploading the files to your server, make sure to undo any previous pointing that was directed to Rock's IP. To do this, simply go to the same location where you made the pointing and delete the record that is directing to our IP.
Additionally, you need to verify if there are any specific mandatory configurations related to hosting the subdomain on your server.
For any technical server-related questions, we recommend contacting your server's support directly.