.png?height=120&name=rockcontent-branco%20(1).png)
Learn some tools and shortcuts that will help you in your creative studio!
There are plenty of tools and shortcuts available in Ion to help you find what you’re looking for relatively quickly. In this article, we’ll walk you through some of the tools that can help you find what you’re looking for when working on an Ion page.
Keyboard Arrows
One thing I can’t really live without at this point are the direction arrows on my keyboard. You can use the up and down arrows to move up and down through the hierarchy of an element. So, if you select a button and hit the up arrow on your keyboard, it will select the column housing that button. If you hit the up arrow again, it will select the row housing that column, etc. The left and right arrows can be used to go through every element in the area. So, instead of going through the hierarchy, the next element in the area will be selected.
The arrows on your keyboard are an invaluable resource to troubleshoot something on your page. Let’s say there’s some extra space around an element, but you’re not sure where it’s coming from, you can select an element inside of the area where you see the extra padding and then hit the up arrow on your keyboard until you see a micro-theme or styling applied that adds padding. You would then be able to remove that micro-theme/styling to remove the extra space.
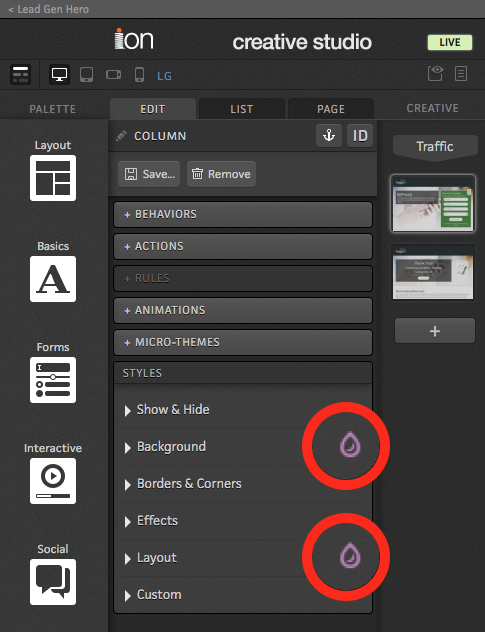
Ink Droplet
Something that ties in with the ability to use arrows to cycle through elements is the purple ink droplet that appears in the style area of your creative studio when a custom (i.e. non-micro-theme) style is applied to an element.
When you’re using your keyboard to cycle through elements and are looking for styling that’s applied to something, you‘ll want to look at your creative studio after selecting each element to see if there’s custom styling applied to that element (if not a micro-theme).
Search
Another tool that is often overlooked is the search feature available while editing. Hidden elements (and plenty of others that are visible) can be found quickly using the search feature.
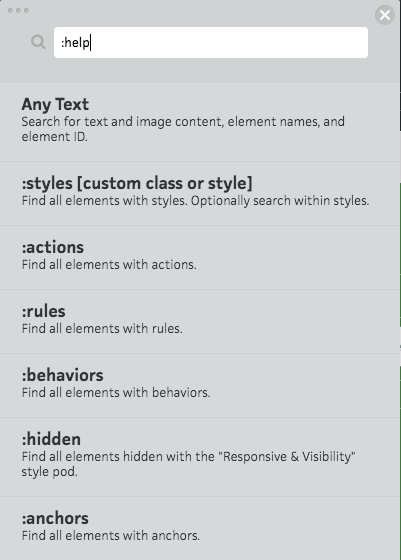
While editing a page, you can hit the / key on your keyboard to open a search box. You can do simple searches for text on the page in here, but you can also search for things that aren’t quite as obvious. Not sure what to search for in creative studio? With the search box open, you can type in :help for some common search queries and terms used in the search.
For example, you can type :hidden into the search box to see a list of all elements that have are set to show/hide in different viewports or based on the presence of data. So if you accidentally made something hide in every viewport, you can find it in the :hidden list and jump to the element to either make sure it shows in one of your viewports or delete it altogether if you don’t need it.
Labels
You can also label elements to give them more specific names than the ones that are assigned by default. I know that this could feel a bit tedious to rename every element, but it can be beneficial for larger pages that have a lot going on in them - especially when there are a lot of elements set to show and hide.
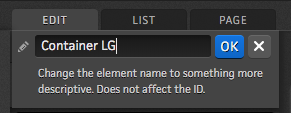
Whenever you have something selected, you can click the pencil icon next to the label at the top of your creative studio. Once you click the pencil, it will open a text box that you can use to enter something more specific.
If you have a bunch of containers set to show/hide in different viewports, you might want to add something to the label that specifies what viewport it is meant to be seen in, such as Container XS, Container SM, etc.
When you try to edit the page at a later date, it will be a lot easier to find the containers that you want to edit in each viewport because they will have clear labels assigned to them. You can then search for those labels using the search feature and look for them in your creative studio’s List tab.
If you have any questions, please contact us on help@rockcontent.com. 😀