.png?height=120&name=rockcontent-branco%20(1).png)
Creating a Contest - Step 1
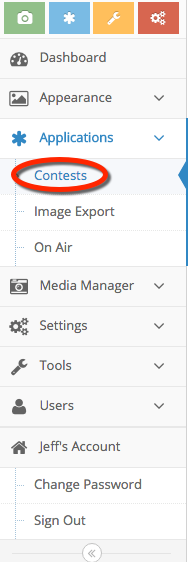
The contest feature can be found under the tab Applications > Contest in the left margin menu.
To create a new contest, follow these steps:
- Click the "Create Contest" button.

Under the General tab, fill in the following information:

Name
Enter the contest title as you want it displayed at the top of the contest page and in the "Contests" section of the sidebar menu.
Winner Selection Type
There are two winner selection options, each with slightly different fields to fill in.
I. Highest Voted A defined number of winners will be chosen based on user votes during a defined voting period. The winners will be displayed at the voting end date/time and ordered by the number of votes. You can review the number of votes for each entry by viewing the report for a given contest. Users will be able to vote for an entry from the contest page or the media item view page by clicking the “vote for me” link.
- Number of Winners Specify the number of contest winners.
- Max Entries Per User. Enter the maximum number of entries an individual user can submit to a contest. The default amount is one.
- Submissions Start. Select the date/time when users can begin submitting images/videos for the contest.
- Submissions End. Select the date/time when users can no longer submit contest entries.
- Voting Start. Select a date/time when the voting session will begin.
- Voting End. Select a date/time when the voting session will end.
- Voting Text. If desired, enter your own customized text for the link users click when voting for an entry on the contest page. The voting text will only appear during the Voting Period of the contest. If you do not select a voting period for your promotion then this section will not apply.
- Round name. If you are going to have more than one round, specify a name for the contest round, for example, "Semifinalists" or "Finalists." This name will display in the pull-down menu on the contest page. To add additional rounds to the contest, click the "Add Another Round" button at the bottom of the page. (Note: This button appears only after you've created the initial round.) Each round can have a different winner-selection type.
- Include Images/Videos These two toggles allow you to elect the type of media you are accepting as submissions for this content.
- Anonymous Voting Another toggle to select whether or not you want to enable this feature. If turned on, users can cast their vote without having to display their identity. Anonymous voting is based on browser sessions.
II. Admin Selected The administrator chooses a defined number of winner(s) at any time during the round. Those winners will be viewable to be public at the scheduled winner-selection date/time. Administrative Selection has most of the same fields as Highest Voted, except that the Vote Start/End field is replaced by the Winner Selection Date, which is detailed below.
- Winner Selection Date. Select a date/time when the winner(s) will be chosen.
When you're finished with the contest Details, click the "Save" button.
Creating a Contest - Step 2
From the Appearance tab, you can add six optional, customizable HTML areas to enhance your contest page:

- Pre-Contest HTML. Use this section to promote the contest. Promotional content is displayed until the contest start date is reached, at which point the “During Contest HTML” screen is shown.
- During Contest HTML. Use this section to display content and information—e.g., contest details, submission deadlines, and advertiser promotion—on your contest page while the contest is running. If the winner is being selected by voting, then once the voting start date is reached, the "Voting HTML" screen is shown.
- Voting HTML. Use this section during the voting period, if applicable, to display content and information, such as per-day voting limits, winner announcement date, and advertiser promotion.
- Post-Contest HTML. Use this section to display content, such as highlighting winners, after the contest has ended.
- Legal HTML. Use this section to publish your contest rules; by default, the text is displayed off an "Official Rules" link at the top of the contest page.
- Upload HTML. Use this section to display information, such as reminding users about desired content or promoting the advertisers, on the contest upload page.
When you're finished with the contest Appearance, click the "Save" button.
Next, click on the Content tab to continue customizing your Contest. (Note: You must save after updating each tab/section.)

From the Upload tab, you can control required fields for content submissions and create and define an entry form that the user must complete prior to entering the contest.

- Required Fields Check the corresponding boxes to select required fields (title, description, tags, location) that the user must fill in when either uploading new content to the contest or submitting content from the user’s gallery.
Entry Form Custom Fields. After a user uploads an image/video to the contest, you can require the user to complete a form. If you have Contest Rules or Terms of Service (i.e., the text in the "Legal HTML" field of the Appearance section), the form will display that text, along with any additional custom fields that you might add in order to gain marketing or contact information from your users. For example, if you want to be sure you have users' current contact information in order to contact the winners, you might add a text box custom field with the description, "Please tell us how to contact you in the event that you are a winner:"

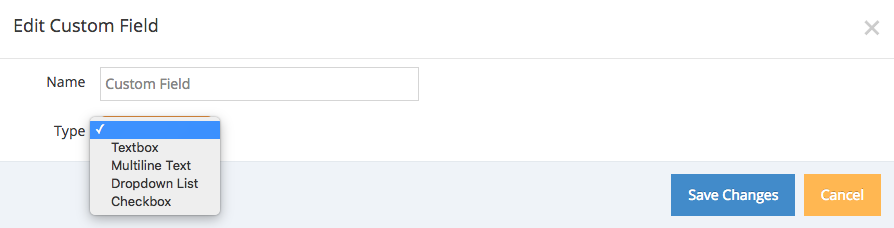
To add a custom field:
-
Click the "New Custom Field" link.
-
In the "Name" box, input the text/description that will appear alongside the custom field.
-
From the drop-down menu, select the desired field type—text box, multi-line text box, drop-down list, or check box.
-
If you select "drop-down list," another box will appear in which can input the text choices that you wish to appear on the list; simply type in the text, click "Add Choice," and repeat to add more choices.
When you're finished, click the "Save" button.
Congratulations! You have now completed all the steps to creating a contest. If you go to your White Label page you will be able to see your new Contest.