.png?height=120&name=rockcontent-branco%20(1).png)
Create unique, responsive content experiences—from articles, to social walls to live events—and plan where that content will live and how it will be promoted. Each content experience can be distributed in multiple places, including Wordpress, Live microsites or via embed, and each one can be promoted on multiple amplification channels, including Twitter, Facebook and LinkedIn.
- Plan New Content
- Create Your Distribution Network
- Remove a Publication Channel
- Create an Amplification Network
- Remove an Amplification Channel
Navigation
Dashboard > Your Latest Projects > New Project
Plan > Projects > New Project
Permission Level
Administrator | Developer | Editor
Plan New Content
What do you want to create?
- Go to your Dashboard and select a project from the Your Latest Projects section. You can also go to Plan > Projects in the left navigation bar, and select a project from the All Projects page.
- Select the type of content you would like to create from the provided options.
- Click on the Live logo to upload an image.
- Click on Title and provide a title for your content.
- Click on Description to provide your audience with a description of your content.
- Click Save to save your content to your project.

Create Your Distribution Network
Where would you like to publish it?
Select multiple publication channels to distribute and promote your content simultaneously, or at a scheduled time.
Note:
Unavailable publication channels will be greyed out depending on the type of content you have created.
Wordpress
Note: To connect Wordpress to Live, XML-RPC must be enabled on a clients' site in order for the one-click Wordpress publishing to function. Click here for more information from Wordpress' documentation
- Click on the Wordpress logo to select your WordPress.org site as a publication channel.
- Use the drop-down menu to select the WordPress site you would like to publish your content to.
- Select a date and time to publish your content, and click Save to save your preferences. Or if you wish to publish your content now, click on Publish Now. Note: If your Wordpress.org site does not appear in the drop-down menu, click on Not Listed? > Leave This Page to add your Wordpress.org URL to your Channel Settings.
Microsite
- Click on the Microsite logo to select a Whitelabel template as a publication channel.
- Use the drop-down menu to select a Whitelabel template you would like to publish content to.
- Select a date and time to publish your content, and click Save to save your preferences. Or if you wish to publish your content now, click on Publish Now. Note: If your Whitelabel template does not appear in the drop-down menu, click on Not Listed? > Leave This Page to select a Whitelabel template, or create a new one (Contact your sales representative to acquire more Whitelabel templates if necessary)
Embed
- Click on the Embed logo to select an Embed template as a publication channel.
- Use the drop-down menu to select an Embed template you would like to publish your content to.
- Copy the div code to your clipboard and click Save. Place the embed on your page, where you would like your content to appear.
Note: If your Embed template does not appear in the drop-down menu, click on Not Listed? > Leave This Page to select an embed template from the Embed, Pinboard, Timeline or Legacy Embed tabs. Copy the div or iframe code to your clipboard and place it on your page.
- Click on the Twitter logo to select your Twitter account as a publication channel.
- Write a tweet (up to 140 characters) about your social post in the provided box. Click on the bottom right logo to upload an image to your tweet. (optional)
- Use the drop-down menu to select a Twitter account to distribute your social post through.
- Select a date and time to publish your content, and click Save Tweet to save your preferences. Or if you wish to publish your content now, click on Publish Now. Note: If your Twitter account does not appear in the drop-down menu, click on Twitter account not listed? > Leave This Page to add your a Twitter account to your Channel Settings.
- Click on the Facebook logo to select your Facebook page as a publication channel.
- Write a Facebook post about your content in the provided box. Click on the bottom-right logo to upload an image to your Facebook post. (optional)
- Use the drop-down menu to select a Facebook page to publish your social post to.
- Select a date and time to publish your content, and click Save Post to save your preferences. Or if you wish to publish your content now, click on Publish Now. Note: If your Facebook page does not appear in the drop-down menu, click on Facebook page not listed? > Leave This Page to add your a Facebook page to your Channel Settings.
- Click on the LinkedIn logo to select your LinkedIn account as a publication channel.
- Write a LinkedIn post about your content in the provided box. Click on the bottom-right logo to upload an image to your LinkedIn post. (optional)
- Use the drop-down menu to select a LinkedIn account to publish your social post to.
- Select a date and time to publish your content, and click Save Post to save your preferences. Or if you wish to publish your content now, click on Publish Now. Note: If your LinkedIn account does not appear in the drop-down menu, click on LinkedIn account not listed? > Leave This Page to add your a LinkedIn account to your Channel Settings.
Remove a Publication Channel
To remove a publication channel, click on the X, and select Yes.
Note: Removing a publication channel, also removes any associated social posts from your project, including scheduled tweets, Facebook or LinkedIn posts. This will not however unpublish content that has already been published to your publication channel.
Create an Amplification Network
Tell People about it
Select a social media channel to promote your created content through.
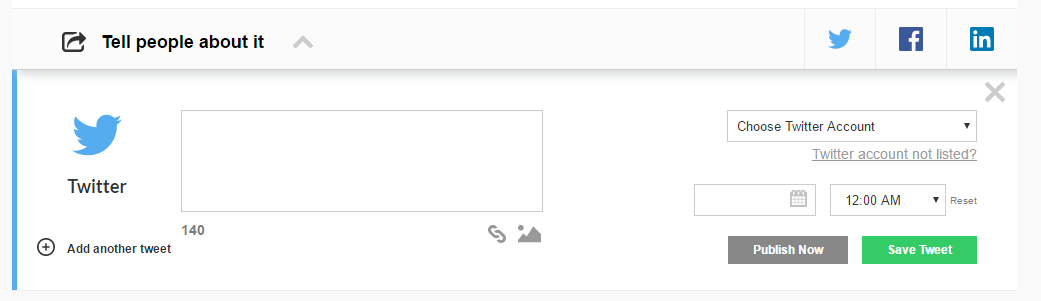
- Click on the Twitter logo to promote your content through your Twitter account.
- Write a tweet about your content (up to 140 characters) and click on the bottom-right logo to add an image to your tweet (optional)
- Use the drop-down menu to select a Twitter account to promote your content through.
- To add multiple tweets or select multiple Twitter accounts to promote your content through, click on Add another tweet.
- Select a date and time to publish your tweet, and click Save Tweet to save your preferences. Or if you wish to publish your tweet now, click on Publish Now. (Note: tweets will take about 10 seconds to appear in your Twitter feed) Note: If your Twitter account does not appear in the drop-down menu, click on Twitter account not listed? > Leave This Page to add a Twitter account to your Channel Settings.
- Click on the Facebook logo to promote your content through your Facebook page.
- Write a Facebook post about your content and click on the bottom-right logo to add an image to your post (optional)
- Use the drop-down menu to select a Facebook page to promote your content through.
- To add multiple Facebook posts or select multiple Facebook pages to promote your content through, click on Add another post.
- Select a date and time to publish your Facebook post, and click Save Post to save your preferences. Or if you wish to publish your post now, click on Publish Now. (Note: posts will take about 10 seconds to appear in your Facebook page's newsfeed) Note: If your Facebook page does not appear in the drop-down menu, click on Facebook page not listed? > Leave This Page to add a Facebook page to your Channel Settings.
- Click on the LinkedIn logo to promote your content through your LinkedIn account.
- Write a LinkedIn post about your content and click on the bottom-right logo to add an image to your post (optional)
- Use the drop-down menu to select a LinkedIn account to promote your content through.
- To add multiple posts or select multiple LinkedIn accounts to promote your content through, click on Add another post.
- Select a date and time to publish your LinkedIn post, and click Save Post to save your preferences. Or if you wish to publish your post now, click on Publish Now. (Note: posts will take about 10 seconds to appear in your LinkedIn account's feed)Note: If your LinkedIn account does not appear in the drop-down menu, click on LinkedIn account not listed? > Leave This Page to add a LinkedIn account to your Channel Settings.
Remove an Amplification Channel (social post)
To remove an amplification channel, click on the X on any social post module, and select Yes.
Note: Removing an amplification channel or social post, removes the social post from your project, including scheduled tweets, Facebook or LinkedIn posts. This will not however unpublish social posts that has already been published to your publication channel.